
Hoof Repair - Stitching and Gluing Hole in Hoof

In 2010 our off-track thoroughbred, Rosie (Hey Rose), sustained a cut just above the coronet band on her right front, that eventually migrated down to her hoof in the form of a pretty large hole. We just left it and watched it for a while, but the hoof started absorbing too much water and began "blowing" out. Unfortunately I don't have any pictures from before we started patching but we do have progress photos below. There was also a crack developing that ran from the hole up towards her coronary band. So we decided it would require a repair involving stitching and gluing.
We had found the idea for stitching and patching from a YouTube video of a repair job done on a quarter-crack on a race horse at Belmont, by farrier Ian McKinlay. My husband had done a repair very similar to the one in the video on our other horse with great success, using Yasha glue and stitches. This time around, the repair would take several rounds of work spread out over about a year as the injury grew down and out the bottom of the hoof.
That video has been removed but we found another by the same farrier. Here he also uses butyl tape. The crack on the original horse was worse than this one.
The video is a bit long but I highly recommend watching it as it gives a much more complete picture of the type of repair we did. The drilling step is particularly interesting.
ROUNDS ONE AND TWO
Rosie's first two patch jobs were glue only (Yasha for round one and Adhere for round two), no stitches. The weather was a bit cold so we used a heat gun set on low, both to dry the hoof and to warm it up a bit to help set the epoxy. As shown in McKinlay's video, if there is any sign of infection or raw flesh there are additional steps to prevent infection before stitching and gluing. You don't want to trap an infection under a patch. Del Dremeled the crack to get the dirt out. Without the stitches, wires, or screws to adhere to, these patches did not hold very well but we also had wet weather working against us.
ROUND THREE
For the third patch my jobs were to clean and dry the hoof, take photos, and keep Rosie company. The weather was warmer so I just used paper towels and air-drying, no heat gun.
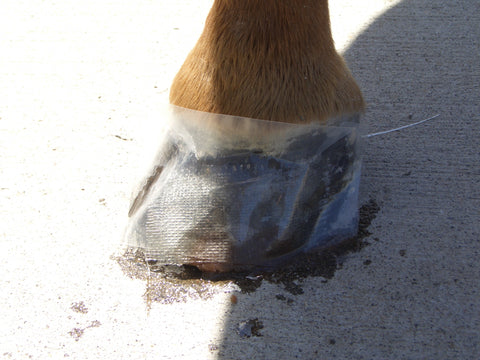
This time we used marine epoxy and wires left over from other projects, and screws. Del first sanded and roughed up the surface of the hoof to take the glaze off and provide a better bonding surface. He drilled 5 sets of holes for the wires with a very thin bit using a Dremel (see McKinlay's video for how this is done). He also pre-drilled holes and screwed in 5 screws to help anchor the epoxy, as on previous occasions some of the epoxy popped off after a while. Of course you want to make sure the screws are not too long. Here is the hoof with 3 of the 5 stitches in. You can click the photo to view full size.

It looks a little Frankenstein-ish at this point. Most of the glue from the previous repair had still been hanging onto the hoof but not really holding things together any more, so we removed it, other than the glob you can see at the bottom center of the hoof. Unfortunately I didn't get a good shot of the hairline crack that runs from the top right of the hole up towards the coronet band. The stitch you can barely see at the top right of the hoof is holding that together. We were actually more concerned about that than the hole itself at this point, and it's why we decided to do stitches in addition to glue this time.
The marine epoxy has a 24-hour cure time and the general rule of thumb with epoxy is the longer the cure time the stronger the bond. After stitching he smeared the epoxy on with a popsicle stick and covered it with plastic so he could shape it a bit. Plastic also lets you push the mixture fully into the hole and crack, and peels right off once the epoxy is set, but not before. By the way, this is marine epoxy mixed with magnetite, since he had some left over from a mini-windmill project he built with our son. Talk about hooves of steel - I should have checked to see if a magnet would stick to her hoof! One issue with this though is your file and nippers will probably get dull when trimming the hoof. We would not normally mix magnetite into the epoxy, we just happened to have it left over when it came time to re-patch the hoof.

Some of the glue ended up smushing out the top and getting into her hair, so next time we would duct tape and/or vet wrap around the coronet band to prevent that. But it was a very thin amount and is not bothering her at all since it is flexible and the excess is breaking off. You do want to be careful of that however, because it's near impossible to remove the epoxy once set, and if you had a large quantity of it in the hairline it will likely cause some issues.
Here are the tools used. I missed getting a picture of the Dremel.

Then he wrapped the foot right over the plastic and epoxy. This epoxy takes 24 hours to fully cure and we didn't have a stall, so this is how we kept the foot dry over night.

I hung out in the driveway with Rosie for 4 or 5 hours to keep her from moving around too much while the epoxy cured. For a horse that can be VERY impatient, she was a really good girl. Animals know when you are trying to help them. She pretty much snoozed through it all. Even though her pasture buddy was on the other side of the fence and we didn't have her tied, she barely moved the entire time. This is a horse that is normally stomping her feet and such if you make her stand around for 10 minutes. Amazing. By the way, there has been no pain involved in this entire process. Even during drilling Rosie never flinched. The timing was just right in that we had a sunny day after a few cold ones so the horses were very sleepy and happy to stand around absorbing the heat.

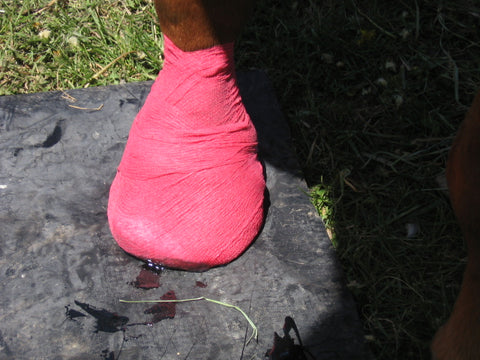
Note that if you use the Yasha or the Adhere hoof epoxy, you don't have to wait very long for it to cure. After a few hours the epoxy felt pretty hard to the touch, and he put a SHOOF boot on to keep her from wearing down the vet wrap. There are other boots that would be better at keeping the foot dry out in the pasture but this setup worked pretty well.

We took the boot and wrapping off late the next morning and all was well. I even took her for a 10 mile ride that afternoon with hoof boots on! Now it's just more waiting for the foot to grow, and as it does the hole will move down. Our first endurance ride of the season is May 7th. The hole will probably be near the bottom at that point. Hopefully we won't have any problems when it grows down to ground level, but we think between the repair work and hoof boots she should be in good shape.
ROUND FOUR: 5/23/2011
The first three rounds described above worked really well. Eventually parts of the patch cracked off, but everything in the critical areas (the large hole in her hoof, the crack above that, and where the screws were put in) stayed connected for longer than expected. For Round 4, Delmer removed whatever was remaining from the Round 3 patch and started fresh. He machine brushed the hoof to remove dirt and roughened the surface. The glue doesn’t adhere well to the periople. He then used a small paint brush to coat the inside of the hole, crack, and surrounding area to bond to the surface. This epoxy is very thin so next he mixed wood flour (wood dust produced from sanding) with some of the epoxy to make the putty, and used that to fill the hole & crack. Over that was laid a fiberglass cloth and another layer of epoxy was painted on, saturating the cloth. Plastic was placed over the epoxied area and used to massage the putty well into the hole as well as work any bubbles out of the fiberglass. Vet wrap held the plastic in place and then a piece of soft packing foam was put in the front of a Boa Boot to distribute the pressure protect everything over night till the glue cured. This likely also helped hold the hoof’s natural heat in and speed curing time. The high-front Boa with its padding was drier, softer and provided better protection than the medicinal Shoof boot used earler. The screws were still there from the initial application and the fiberglass was worked around them. We let the epoxy cure until the next day and then I did a short slow ride (as usual in boots) with no issues. She was ready for a trim, so the following day we gave her one. Some time between the patch job and the trim, she chipped a little piece of wall off but it's not all the way through the wall and doesn't seem to be causing any issues.

We noticed that from the hole down she still has lower angles than the other foot (Rosie had very low angles when we got her, and we've been working on bringing them up a bit), but the upper portion has better angles, similar to the left one. We think the cut right at the coronary band probably deprived circulation and caused that hoof to grow slower which why it’s still not as sloped as the left one. The clear stuff that looks like wrinkled plastic is the epoxy and fiberglass. You can see the original screws right through it. It's really nice to be able to see the hoof and monitor it for issues. The brownish area is the hole filled with sawdust-epoxy putty. You can see the chip goes up to the hole. You can also see where I backed the toe with a rasp to avoid more chipping. The hole is now within 3/8” from the bottom so about one more month and the hole should hit the bottom. Below is a closeup of the chipped wall. You can see the hole filled with epoxy-sawdust putty in this one. Notice how the chip goes right up to the epoxy. One of the original wire stitches is on the very bottom of the hoof and will likely be removed on the next trim.

Both feet together. You can tell the injured foot had been trimmed shorter and I had not backed the toe on the other foot yet.

I did a couple more rides afterthese photos with no additional chipping. I had a 50-mile ride scheduled for May 28th and it was looking like we'd be able to do it, hoof patch and all. We were thinking it was possible we'll need to take a month or so off when the widest part of the hole grew down to the bottom of her foot - right in the middle of prime riding season, drat! We were hoping we didn't have to take too much time off as she was looking pretty fit at the time. Here she is booted up for protection the day after the new patch:

And just a funny little side-story. A while before this, Del had cut his finger right at the "coronet band". Just as Rosie's injury grew down into her hoof, his cut has also shown up as a scar on his fingernail - cool!

ROUND FIVE - JUNE 2011
I am happy to report that we completed the Wyoming Pioneer 50-mile ride with our hoof patch! I did have Rosie's boots off for some time on the ride, and as a result, she ended up with a few cracks. You can also see she developed no small amount of flare that we needed to address - probably should have shortened up the trim cycle.

If you tap on this photo and zoom in you can see a crack still close to the coronet band but it was very thin by this point.
Delmer decided to remove all of the Round 4 patch, and start fresh. Round 5 was pretty much the same process as Round 4 but we captured more pictures this time. Here are all the tools he used: 
First step was to remove the old patch, including the screws, and, using a wire brush, rough up the hoof to take the new epoxy. He also used a Dremel to cut off the small piece of hoof that was hanging on at the bottom of the hoof (compare the first picture to this one):

Here is the piece that was removed:

Then rasped off some of the flare and applied a layer of marine epoxy over the roughed up hoof.

Then a piece of fiberglass:

And another layer of epoxy:

Then some sawdust mixed with epoxy to fill the hole. The sawdust is to make it into a less runny putty type mixture:

That was followed by another layer of fiberglass and epoxy, covered by a sheet of plastic:
Then a piece of thin foam in front, and vet-wrap around the whole hoof. The foam is so the epoxy stays nice and smooth while curing with the boot applied:

Lastly, a Boa boot for the night. This was many years before Scoot Boots were invented but actually the Boa Boot was probably better for this type of application. It was really awful for riding though!

Here is how it looked the next day after curing - beautiful despite the little piece of vet-wrap stuck to the bottom!

Two days later he decided to put one more layer of fiberglass for good measure. The duct tape is to keep the epoxy out of her hairline:

Again followed by plastic:

And the thin foam (first time we captured a picture of this) held on by vetwrap:

And boot - Done!

Since the hole is now at the bottom of her hoof, Rosie is getting some time off from endurance rides, with our next one planned for July. In the meantime we should be able to do some poker rides and easier training rides to keep her tuned up.
The hoof went on to make a full recovery. Where the wall had "bloomed out" before the patch job, it was now almost perfectly straight. The hole did not seem to bother her at all and I went on riding her for many more years.